
ScreenForge v1.1a is a combination of three MS Word templates that work together to create a Script Cover page, Title/Fly page, and the Screenplay itself. It has been designed with the formatting rules outlined in the book, The Complete Guide To Standard Script Formats Part I: The Screenplay, by Hillis R. Cole, Jr., and Judith H. Haag. The Screenwriter's Bible, by David Trottier, also contributed some useful screenwriting elements. ScreenForge provides the means to easily write a screenplay in the accepted Hollywood format. It frees the writer to concentrate on the expressive craft of writing rather than the rigid rules of formatting, while maintaining the familiar interface and functionality of MS Word.
NOTE: Follow these links for important information about the licensing and registration fee for the ScreenForge screenwriting software.
After spending a lot of time examining other screenwriting templates that are available for MS Word, I was left feeling very disappointed. Most of those templates did not live up to their claims. They were often "buggy," and they rarely met proper formatting rules for Hollywood screenplays. Some of these templates were almost as expensive as the dedicated screenwriting programs. Personally I don't understand why anyone would spend $175.00 on a template when you can get a dedicated program for under $200.00. If you have that kind of money to spend you might as well get the full program. It was then decided that the best thing to do would be to create a template for MS Word that would be extremely easy to use, and work to our standards. After completing ScreenForge v1.0, which later became version 1.1, and more recently version 1.1a, we decided to make it available to other filmmakers and writers who deserve something better than what has been available. We are very satisfied with ScreenForge, and we hope that you will be too.
ScreenForge has been designed with the independent filmmaker in mind. To give a professional look to the screenplay, even when you're on a limited, indie budget. So, if you already own MS Word, and you're on a limited budget, please consider ScreenForge as a serious option before spending hundreds of dollars on an expensive, dedicated screenwriting program. Check out the list of features below and you'll see that ScreenForge has everything you need to create a professional looking screenplay.
ScreenForge v1.1a will work within MS Word 6, 95, 97, 98, 2000, 2001, 2002, 2003, etc., on both Windows and Macintosh systems. Since the ScreenForge software works within the MS Word application, and doesn't access the computer's operating system, it should work just fine on any computer system capable of running MS Word 6 or higher. The software isn't operating system specific (although it was designed on a Windows 95 system).
Exception:
The only known exception concerns Word 6 on a Macintosh system running MacOS 8.5 or higher. Due to changes introduced to the Macintosh operating system in version 8.5 by Apple, MS Word 6 templates which contain "AutoMacros" and/or have shortcut keys assigned to macros (ScreenForge uses both), generate either an "WordBasic Err=25. Out of Memory (Stack Space)." or "WordBasic Err=509. This command is not available." error message. For more information on this particular Word 6 problem read article number Q224153 in the "Microsoft Knowledge Base", on the Microsoft website.
Solution:
There are really only two (2) ways to solve the problem. You must either downgrade the operating system to MacOS 8.1 (in order to use ScreenForge for Word 6 on the Macintosh), or upgrade to MS Word 98 or higher for the Macintosh (remember to download the correct version of ScreenForge for use in Word 98 or higher).
Additional Macintosh User Information:
If you are using Office v. X for the Mac then the ScreenForge custom toolbar button images will appear to be blank. Microsoft acknowledges this to be a problem for Excel X, PowerPoint X, and Word X. For more information on this particular Office X problem read article number 312198 in the "Microsoft Knowledge Base".
Solution:
Microsoft has corrected this problem with the Office v. X for Mac Service Release 1 (SR-1) update. Once you install this update all of the ScreenForge custom toolbar button images will be viewable. Read the 323600 "Microsoft Knowledge Base" article for a complete list of issues fixed in Office v. X for Mac.
NOTE: The ScreenForge software has been designed for the English language version of Word, and may not work properly in other language versions due to certain language specific programming codes. There are programming inconsistencies, as well as variations in basic MS Word features, between the English language version and versions designed for other languages.
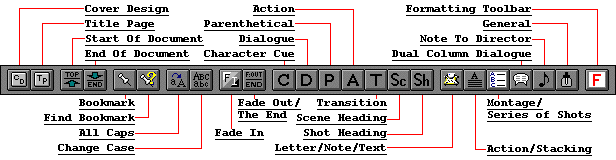
The ScreenForge v1.1a toolbar, shown here, allows easy access to the features that are used in the creation of a screenplay. Seventeen of these buttons have combination keys to allow the user to run macros or switch between element styles easily. Four of them are built-in Word functions, Start Of Document, End Of Document, All Caps, and Change Case. Three are macros, FADE IN:, FADE OUT THE END, and SHOT STYLE, one is used at the beginning, and the other at the end of the screenplay to automatically insert the text, as well as the formatting of these elements, for the user, the last one turns a selection into a shot style type sub-heading. The final ten that have combination keys assigned are certain screenwriting elements that are or may be used in a screenplay, Character Cue, Dialogue, Parenthetical, Action, Transition, Scene Heading, Letter/Note/Text, Action/Stacking, Montage/Series of Shots, and General. Combination key assignments can be changed, or assigned to any styles or macros available, to better suit the individual's work habits.
The Cover Design macro loads a new document formatted for the creation of the screenplay's Cover Page. Just type in the screenplay's title. (NOTE: Screenplay cover pages on screenplays that are submitted to studios or production companies should be left blank.)
The Title Page macro loads a new document formatted for the creation of the screenplay's Title/ Fly page. All you have to do is type in the screenplay's title and select the place holders provided and replace them with your own information. (Using Page/Print Layout view will allow for easy access to the footer information.)
Use the Bookmark macro to mark your place at the end of an edit session.
Use the Find Bookmark macro to quickly return to your last editing session.
The Shot style is a macro which sets the paragraphs style to the Heading 2,First Draft style (the same as the Scene Heading button) and then sets the paragraph formatting to double spacing instead of the normal triple spacing. This may be used as a way to enter sub-headings into the screenplay.
The Letter/Note/Text style may be used in the screenplay to indicate something which is read by the audience rather than voiced by a character on screen or in a voice over. (i.e., An insert of a handwritten or typed letter or note, or perhaps text on a computer screen, etc.)
The Action/Stacking style, normally referred to as "Stacking Action," may be used to write single spaced, single line paragraphs of action in the screenplay. (A practice which has recently gained in popularity.)
The Montage/Series of Shots style may be used to write action sequences, fight scenes, and car chases, as you move your audience quickly through time.
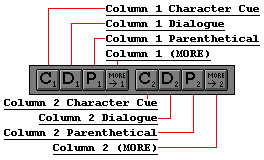
Need to have your characters talk at the same time? Just click on the Dual Column Dialogue macro button. This macro inserts a two column, single row table and activates the Dual Column Dialogue toolbar providing easy access to the Dual Column Dialogue styles. It can also be used for indicating subtitles.
Use the Note to Director macro to outline something special in a scene, indicate a technical requirement to create a certain atmosphere or effect, or make a suggestion to the Director. (NOTE: This should be used sparingly if at all.)
The General style may be used for elements similar to scene headings, such as, BEGIN TITLES/ END TITLES., FREEZE FRAME., END FLASHBACK, etc., but wouldn't be numbered when scene numbers are used.
The screenplay Formatting macro activates and/or deactivates the ScreenForge Formatting toolbar.
This formatting toolbar has some very useful features to help you create the right look for your screenplays.
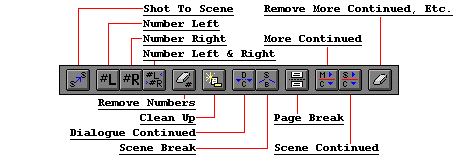
The Shot To Scene macro changes all Shot style headings (those created with the Shot Style macro) from double spaced sub-headings to normal triple spaced headings.
The # Left button runs the Number Scene Headings Left macro. This will number your scene headings on the left side only, regardless of how your screenplay may already be numbered.
The # Right button runs the Number Scene Headings Right macro. This will number your scene headings on the right side only, regardless of how your screenplay may already be numbered.
The # Left & Right button runs the Number Scene Headings macro. This will number your scene headings on the left and right sides, regardless of how your screenplay may already be numbered.
The numbering macros also work to properly format your scene headings that extend to two lines. You can use regular dashes (-), Em Dashes (), or En Dashes () in your shot and scene headings. (I recommend the Em Dash.) Do not use two dashes in a row (--) in your shot or scene headings.
The Remove Numbers button runs the Remove Scene Heading Numbers macro. This will remove all your scene heading numbers, regardless of how your screenplay may already be numbered.
The Clean Up macro removes manual page breaks, empty paragraph marks, and leading and trailing spaces from the screenplay. (Things you shouldn't have in your screenplay, but just in case you do this macro will remove them quickly and easily.)
The Dialogue Continued macro may be used to break dialogue across pages. It does NOT use (CONTINUED) or CONTINUED:. It will automatically insert the (MORE) style and text, and it will copy and paste the character's name being continued onto the next page with (CONT'D) after it.
The Scene Break macro may be used to break a single, long paragraph (which is already breaking across a page break) into two separate paragraphs. It does NOT use (CONTINUED) or CONTINUED:.
The Page Break macro may be used to move any paragraph from the bottom of a page to the top of the next page. (It reformats the paragraph with zero space before it and a page break before it.)
The More Continued macro may be used to break dialogue across pages. It DOES use (CONTINUED) and CONTINUED:. It works very much like the Scene Continued macro, except that it is for breaking dialogue across a page. It will automatically insert the (MORE) style and text, the "continueds", and it will copy and paste the character's name being continued onto the next page with (CONT'D) after it.
The Scene Continued macro may be used to break scenes across pages. It DOES use (CONTINUED) and CONTINUED:. It will automatically insert (CONTINUED), and CONTINUED:, at the bottom right and top left sides of the page respectively. If scene numbers are used, the number of the scene being continued will be placed properly on the page. The number of times a particular scene has been continued will also be placed properly on the page.
The Remove More Continued button runs the Remove More Continued Etc macro. It will remove most of the changes done to the screenplay through the use of the five dialogue and scene continuing macros.
If "continueds" ARE used, these three macros, Scene Continued, More Continued, and Page Break, can be used as needed one page break at a time from the first to the last page of the finished screenplay. If "continueds" are NOT used then you can use the Dialogue Continued, Scene Break, and Page Break macros instead.
If you'd like to structure your screenplay before you start writing, or quickly and easily rearrange scenes long after they've been written, then use Word's Outline view. If you're an independent filmmaker you can use ScreenForge's numbering macros to create your own shooting and/or production scripts.
IMPORTANT: All future versions of ScreenForge will only be made available to "registered" users of the software. Read the ScreenForge software license agreement for additional information.
ScreenForge v1.5 is currently nearing completion, and once it is ready for distribution we will begin development of ScreenForge v2.0. Both of which will offer many useful features, especially to the independent filmmaker. Such as:
A template for creating Revision pages for your screenplay. *ScreenForge v1.5*
A template for creating Shooting Schedule Breakdown Sheets. *ScreenForge v1.5*
A template for typing, in proper format, a Shooting Schedule from the Breakdown Sheets. *ScreenForge v1.5*
An Index Card layout of Scene Headings. *ScreenForge v1.5*
A "Smart Keys" feature, which enables the ability to switch to a new script element style just by hitting the Tab or Enter key. (This new feature actually does a lot more than this, so check back later to learn all of the details.) *ScreenForge v1.5*
Templates designed for Taped Formats for Television. (i.e., Talk shows, Game shows, Variety shows, Sitcoms, etc.) *ScreenForge v2.0*
These features, and others, are currently being developed for future versions of the ScreenForge screenwriting software, along with any features specifically requested by users of the current or earlier versions of the ScreenForge software. Your helpful comments and suggestions can only make the future of ScreenForge better for all of us. Feel free to suggest ideas and opinions about how to make the software better. We will do our best to incorporate new features that are both intuitive and imperceptible. Providing the most functionality with the lowest possible learning curve.
Remember to check back periodically for the most recent information and updates to ScreenForge, which will become available as new features are added. All proceeds from ScreenForge go toward the development of our first feature film, so if you are happy with the software, and wish to continue using it beyond the initial forty-five (45) day evaluation period, then you must register it.
Link Exchange Program: Information for exchanging links with us.
|
Home | Apotheosis Pictures | ScreenForge v1.1a | ScreenForge v1.5 | ScreenForge v2.0 |
|
Download | ScreenForge User License | ScreenForge Registration | Resources | Contact |
ScreenForge and Apotheosis Pictures Productions © 1998-2003. All Rights Reserved. All versions of Microsoft Word for Windows and Macintosh are registered trademarks of Microsoft Corporation. Macintosh is a registered trademark of Apple Computer, Inc.